Pages

Thursday, May 31, 2012

Twist Ties......

I wanted to show you a great little find I found!!    I bought these a while back at Walmart, they are suppose to be wine glass markers--- you tie them around the stem of a wine glass so that yu don't get your glasses mixed up at parties.  But I bought them thinking that they would be GREAT twist ties!!  They come in a package of 12 and were around $3.00.  I use them for everything--- they are so much better than trying to find one of those paper covered wire twists, that don't last very long.   


you will find 100 uses for them.... I use them to close all my bags of "stuff" but they are really handy to wrap around your appliance cords too. They are made of silicone and are re-useable.   I love when I find a GREAT IDEA!!

Wednesday, May 30, 2012

Restain Your Banister

My mother decided that she wanted her family room to look different. When you walk in her front door, the stairs to the basement are about 5 feet away from the front door, and to the right of the stairway is the family room. She has this oak banister that she wanted to change. This process does take some time but it is well worth it in the end. Just by staining the railing her family room looks really classy.
The first thing she did was sand it down. This does take some time but is a very important process when staining to get the right color.
After the sanding is done, wipe down the railing so nothing is on it. Usually when you stain they say to use a natural or acrylic bristle brush, apply the stain then wipe it away. What my mom did is used a foam brush, applied the stain and DID NOT wipe the stain off. This gave her a darker and richer color.
She started by staining the top and the bottom of the banister.
Then did the rails in the middle. After the stain has dried apply a coat or two of polyurethane. Let that dry and this is what it looks like!!!!! It is cute and classy.
This is the stain we used. This stain is AMAZING!!!!

Tuesday, May 29, 2012

How to store fresh Vegetables & Herbs

I told you I would let you in on a great way to keep your Asparagus fresh longer.  I do this with fresh cut vegetables & herbs.  Take a wide mouth mason jar or a glass and fill it with a little bit of cold water-- then place your asparagus,cilantro, dill, spearmint, basil, celery ect. into the water and put it in your refridgerator.  They will keep fresh so much longer... during the summer I do this with all the fresh herbs from the garden, then they are ready to use-- I find that I use them more in the things I cook when they are already cut & easy to grab!    


Monday, May 28, 2012

Oven Baked Asparagus

Click the magic button for the recipe
Do you love Asparagus?  We do-- so I thought I would share with you how I cooked it for our dinner on Sunday.  The boys like Asparagus steamed, and grilled, but yesterday I tried it in the oven with Parmesan cheese... oh it was so good.


You can't believe how great it tastes - tender, with a little bit of crisp Parmesan cheese on it.  Yum!  Try it, I know you will love how it tastes.   


Saturday, May 26, 2012

Graduation Bottles

Well my two oldest Grandsons graduated this year!!!!  From PRESCHOOL!! Whew... I almost felt really OLD. haha   I didn't know what to get them, so I decided to use the idea of taking an empty water bottle- cutting it open down the back- and filling it with all kinds of FUN things: suckers, gum, whistles, candy bars, balls, swimming goggles, stickers, stamps ect..... anything you can squeeze into it.  Then tape the slit closed with strapping tape. I decided to put a water bottle label on it, added a ribbon and punched out 2 tags to tie onto them.... they turned out darling and the little boys were thrilled.  Half of the fun was watching them try to figure out how to get everything out of the top!!  This is such a cute idea for sooooo many occasions. 

The printables I used were part of a party package at http://blog.catchmyparty.com/category/printables-free-graduation/  The next graduation gift these little guys get from me might have to be a little bit bigger... but I have until 2025 to figure that one out!!!
Friday, May 25, 2012

Mini Pizzas

                                 I had play day Thursday with my little Grandsons and their Moms.  It's one of my favorite things to do.  We got our list ready of all the PLAYDAYS we want to have this summer, if you haven't downloaded the Summer list printable Jamie posted a couple of days ago-- get it & start planning your FUN things to do too. We made mini pizzas for lunch.. this is our favorite way to make them.  You need dough--  I just used Rhodes rolls- ham, cheese, pepperoni, and pizza sauce.  We also used mushrooms & olives.  You can use any of the toppings you like...... here's how to make them:  


Let your rolls thaw and raise a little bit, so they are nice and fluffy....


then we pressed them & pulled them until they looked like a small pizza crust..


place them on a greased electric frying pan heated to 300 degrees, I flatten them with a small spatula, and flip them so they cook on both sides- they cook up pretty fast...


then spoon a little bit of pizza sauce on each one and top them with your favorite toppings- you can either place them under the broiler for a few minutes or put them in the microwave for a minute or two to melt the cheese.  The little boys loved them, and I think Grandma did too!!!  In fact she even put butter & honey on one & had dessert too! :) 


Thursday, May 24, 2012

How to make Yogurt in your crockpot

I am soooo excited to tell you about my new favorite thing!! Homemade yogurt-- you make it in the crockpot, it's easy & oh so good.   I have wanted to try this for awhile now- my husband has a friend he works with that has made yogurt for sometime, and he would always say how WONDERFUL it tasted compared to store bought.  I promise you, it is so GOOD.  I don't know if it's just because it's fresh or what but do yourself a favor and try it.
You only need 2 ingredients Milk- any kind you want to use soy, 1%, 2% or whole milk works.   I used a whole gallon but you could half the recipe if you don't want to make that much at a time-- and greek yogurt.
First pour 1 gallon of milk into your crockpot  


turn the crockpot on high and heat it up to about 180 degrees...  this will kill any bacteria in the milk, it takes a couple of hours for it to get that hot.  When it reaches 180 degrees, unplug the crockpot and let the milk cool down to about 80 degrees.  It needs to be warmer than room temp- but not so hot that it will kill the live cultures in the yogurt.  It takes 2 hours or so to cool down- if you take the lid off of the crockpot it will cool faster

When it cools down scoop 1 cup or so of the milk out and put it in a small bowl, add 8 ounces of greek yogurt- make sure it has live cultures or bacteria in it. Whisk the yogurt together with the milk & pour it back into the milk in the crockpot


now take 2 large beach towels I lifted the crockpot up and placed one under the crockpot and wrapped it and one more towel around the crockpot like this... to let it incubate.  I know it looks crazy!!
Let it sit on your counter wrapped up for 8-10 hours.  I let mine sit overnight


and when you wake up in the morning take the towels off and look what you have.... beautiful, creamy, smooth yogurt.  A whole gallon of it!!!  It tastes great this way... I put a cup into a bowl, add some of my homemade granola (I posted the recipe eariler for the granola) and then I stir in a tablespoon full of homemade jam ( it has 1/4 of the sugar usually used in jam- I will post the recipe for that next) mix it in with the yogurt & granola and it is so yummy good.  But if you want thicker greek style yogurt, then take some cheese cloth or thin cotton cloth & secure it over a large bowl with rubber bands.  Then pour the yogurt into the cloth & let it sit, it will strain out the whey and you will have thicker yogurt-- but you'll also have less, about a 1/2 gallon- but it will have more protein in it too.  You can use the whey for all kinds of things- I haven't tried using it yet, but you can bake with it & make cheese-- maybe that will be another project.   Each time you make it save a cup of the yogurt to use as your start for the next batch.


I gave a bowl full to Amy & Jamie and still had a lot left, so I put some (about 1/2 C.) into sm snack size baggies and put them in my smoothie basket that I keep in the freezer.  It makes it really nice to have them frozen and ready to add right to your smoothies!!  ENJOY!!! You will have to let me know if you try this-- I am already thinking of the different things I can add to give the yogurt more flavor.  You know I am going to have to try almond extract-- I LOVE almond!! :)

Mindy tried this and wrote to me & said it turned out really runny like water- she wanted to know what went wrong. I am passing the information I gave her along in case it happenes to anyone else. If you add the yogurt to the milk before it cools to 80 degrees it will kill the live bacterias in the yogurt. Without the cultures it wont work-- so make sure that you cool it before adding the yogurt.
Wednesday, May 23, 2012

Summer List

Summer is just starting to show and if you are like me... I need a list of ideas to do with my kids~ Here is one that I made up for this year....


Here is the blank one for you.... Simply click on the image and save to your computer.

Don't know how to add your picture and text to the template? Watch this video to help you.

(Note... this picture is a 8x20 so you could do 2 lists and put them on a 16x20 and get 2 from one print!!! So make a gift for someone)
Tuesday, May 22, 2012

Cleaning the Bathroom Toilet

I don't know about you, but it's not cleaning the toilet I mind so much......  it's the gross toilet brush holder that puts me over the edge!!!  Really I have a problem with cleaning out the toilet brush holder, it gets looking & smelling so gross-- the yucky brown water that is in the bottom of it is just plain GROSS!
So I am going to give you a tip that will solve the problem.  After you have cleaned the toilet with the brush, instead of putting it back into the brush holder-- place in on the toilet like this pictures shows & allow it to air dry for a few minutes.  It doesn't take long, and then when you put it back into the brush holder- there is no water left in it to drain into the bottom- turn brown and start to smell!  Brilliant!!!  So go try it right now-- I promise you are going to love it.  

Monday, May 21, 2012

Fruit Kabobs & Cupcakes

Click the magic button for the full recipe
 
I've been missing in action the last couple of days!! I had an event I was asked to make some food for, soooo that pretty much explains where I have been & what I've been doing.  While I was cutting fruit up for the fruit kabobs I snapped a few pictures & thought I'd show you how I do it...
First wash your fruit, and then cut it in half- scoop all the seeds out


 then place it flat side down on the counter top & with a sharp knife begin to cut the peeling off


until you have gone all the way around it and the cantalope will look like this....


 I did the same thing with the honey dew melon too-- begin by cutting it in half and repeat the same steps


 Cut the top off of the pineapple & begin to slice the skin off the same way... you all probably know how to do this, but the camera was right there on the counter so I thought I would use it- haha
I already showed you how to wash strawberries & Jamie showed you how to wash the grapes in other posts.....  


Cut everything up into chuncks, put them on a wooden skewer and this is what you end up with.... yummy fruit kabobs, so good to serve with anything.

If you want to get fancy... here are a couple of pictures I found from a Bridal Shower I did for a friend a long time ago... maybe 5 years ( how long have you been married Andrea?)
These are fun to make & after spending $80.00 on one for my daughter-in-laws shower I decided I could make them myself......


Click the magic button for the full recipe

Maybe I'll have to make another one and take pictures to show you each step--- the flowers are cut out of a pineapple with a cookie cutter-- and a cantalope ball stuck in the center. 
You can't see it very well, but the strawberry is cut with a knife on the top & I put a mini marshmallow inside... anyway it's a very fun display to make fruit look yummy.


And here are the cupcakes I made for the event.. they were raspberry filled (secret recipe) butter cream frosting, and they were yummy.... I decided to make some for Clair's Birthday too! 


and YES I ate 3 of them!!! The rest are going to work with me so I don't eat them all!!!  Because you know me... I will eat them until they're gone!! :) 

Thursday, May 17, 2012

Garden Cages

I wish I would have had this post ready a few weeks ago-- I know a few years back we took pictures of this whole process from planting to harvesting, but I can't find the pictures anywhere.  I wanted to post this eariler so that you would have time to see it before you started planting your gardens, but welcome to my life!!! haha  So this is the best I can do... We have been doing our garden this way for about 15 years and we love it.  The plants grow up tall and the vegetables are off of the ground, so they are easy to pick.  I don't have any pictures showing you what the plants look like when they are fully grown, so you will just have to believe me when I say it is amazing.  I will post pictures as the plants grow--  But for now lets get started.....
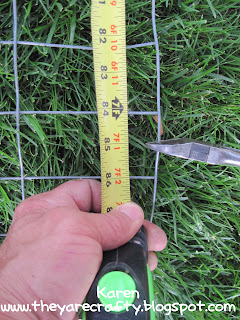
First you need to buy a roll of this fencing, we just call it farm fence you can buy it at Lowes. It has squares that are 2 inches by 4 inches wide.  We use the 3 ft. high size for our cucumbers, and cherry tomatoes.  For our other tomatoes & the peppers we use the 2 ft, height.   You will need a measuring tape & needle nose plyers/cutters.


For each cage you need to measure 7 ft. of fence, you can see in the picture that 7 ft. is right on the wire- but you want to go 1/2 way into the next square to cut it, then you will have a small piece of wire on the end to wrap around & secure the cage together  Doing it this way you will get 7 cages per roll of fence.


after cutting the fence, form it into a circle & with the needle nose plyers twist the small piece of wire around  and continue twisting it tight to secure the cage all the way down the side.


when you are done you will have a 2 ft. or 3 ft. high- round cage, it will look like this

 Next after you have tilled the garden area well push the bottom of the cage into the dirt where you are going to place the cage... leaving a circle in the dirt this way


once you have marked where the cage is going to go, you can dig a shallow hole, pulling the dirt up into a mound around the outside edge of your mark


place your cage inside so that it looks like this, and now plant 2 tomatoe plants on the OUTSIDE of the fence- across from each other on opposites sides. I thought I had a picture of the two plants, but apparently I didn't-- if you scroll down a few pictures you can see how they are planted


we then cover the smaller plants up with a milk jug, this makes it like a green house and will help the plant to grow faster. When the plants start to fill up the jug- remove it from the plant

these are larger plants & don't need to be covered with a milk jug, as the other plants grow to this size you place the stems & leaves inside the squares and help them to grow up the cage


then for the next few weeks after mowing the lawn we pour the grass clippings into the center of the cages, this helps the soil retain the moisture when you water them


this is a picture showing you how we plant our peppers-- because they grow into smaller plants that the tomatoes you can plant 4 to a cage-- again look to see how they are planted on the OUTSIDE of the cage


with the cucumber plants only plant 2 per cage, and weave them into the fence squares as they grow- they will climb the cage & the cucumbers will hang down making them really easy to see and to pick


so here you have the result of 10 hours of work on a beautiful summer day!!!!  I can't wait to have fresh produce from the garden.


This is how we take a piece of PVC pipe and place it through the cages- there are holes drilled in the pipe so that it waters each plant. 


Here is a picture of the tomatoe plants after they have been growing for about 5-6 weeks.  They will start to fill in the cage